Lab 4 - Capture of network traffic#
A computer sends or receives network traffic through its network interfaces. Depending on the network configuration and your own equipment, you can capture network traffic in order to study it, analyse it or even save it to a file for later use.
We need a specific software to carry out the traffic capture. In this practice
we are going to learn how to use the tshark program that will allow us to
do the mentioned actions.
It is also possible to use wireshark, a graphical environment
version of tshark. Everything explained for the latter is also valid for
the former.
Preparing the environment#
Network configuration#
First of all, you have to make sure you have a network connection. For this, open the terminal and run the following:
ip addr
The output should show all of your computer’s network interfaces with their MAC addresses and their IP addresses if they have them.
Depending on the network you are on, the IP will have a different value.
Remember that it must always be in the form of 4 bytes (values from 0 to 255)
separated by dots, for example 192.168.1.120.
In principle, if you use the virtual machine, both on the lab computers and on your PC, you should have no problem when capturing traffic.
Capture software installation#
As mentioned above, we will use tshark and wireshark programs to capture
traffic.
To check if you have these programs installed, use:
command -v tshark
command -v wireshark
If the path to any of the programs is not shown when execute the above commands, it means that it is not installed. So install it using:
sudo apt install tshark wireshark
Get started with tshark#
tshark is a terminal tool that allows us to capture network traffic and save
it to a file or display it on the standard output. To capture traffic, first
find out on which network interface or interfaces of the computer we want to do
it.
To do this, we will use the ip addr command. With it, we can view the IP
addresses of the network interfaces, being able to find out on which of them the
connection is configured.
Note
If you use the virtual machine, you should view 2 interfaces: one called lo or
loopback interface, which gives IP connectivity to the machine itself, and a
second interface whose name will depend on the environment, which will be the
one that gives connectivity to the outside of the machine. You must pay
attention to the second one to make traffic captures.
Once you know the names of the network interface(s) you want to use, you can use
the tshark -D command to view the correspondence between the interface name and
the index to use for captures:
$ tshark -D
Running as user "root" and group "root". This could be dangerous.
1. enp0s3
2. any
3. lo (Loopback)
4. ciscodump (Cisco remote capture)
5. dpauxmon (DisplayPort AUX channel monitor capture)
6. sdjournal (systemd Journal Export)
7. sshdump (SSH remote capture)
8. udpdump (UDP Listener remote capture)
For the lab nodes, we will normally use the network interface of our virtual machine,
so select the index corresponding to the interface listed with ip addr (1
in this case).
The first capture#
To create the first capture, open your terminal and run:
tshark -i 1
This command will start capturing traffic on interface number 1 (the network
interface of the virtual machine as we saw before). The default behaviour is to
display a brief summary of the captured packets in the program output. Press
Ctrl c to stop capturing.
Capturing on 'enp0s3'
 ** (tshark:594982) 00:11:55.871189 [Main MESSAGE] -- Capture started.
 ** (tshark:594982) 00:11:55.871276 [Main MESSAGE] -- File: "/var/tmp/wireshark_wlp0s20f35RkW4P.pcapng"
    1 0.000000000 192.168.1.39 → 255.255.255.255 UDP 909 54712 → 29810 Len=863
    2 3.684236270 fe80::9a97:d1ff:fe77:9368 → ff02::1      ICMPv6 82 Router Advertisement from 98:97:d1:77:93:68
    3 4.094190431 192.168.1.91 → 255.255.255.255 UDP 214 49153 → 6667 Len=172
    4 4.094193127 192.168.1.91 → 255.255.255.255 UDP 218 49153 → 6667 Len=172
    5 2.247868733 MitraSta_77:93:68 →              ARP 62 Who has 192.168.1.95? Tell 192.168.1.1
    6 2.247899195 IntelCor_d1:62:2b →              ARP 44 192.168.1.95 is at c8:09:a8:d1:62:2b
    7 5.119982488 192.168.1.39 → 255.255.255.255 UDP 905 54712 → 29810 Len=863
    8 5.119985457 192.168.1.39 → 255.255.255.255 UDP 909 54712 → 29810 Len=863
    9 9.009472416 192.168.1.91 → 255.255.255.255 UDP 214 49153 → 6667 Len=172
   10 9.009534174 192.168.1.91 → 255.255.255.255 UDP 218 49153 → 6667 Len=172
After a few seconds you will see an output similar to the previous one. Apart
from a first message confirming that the capture is being performed on the
enp0s3 interface and a couple of log messages from the tshark itself, a
summary of each captured packet per line is shown. Their structure is as follows:
Packet number (ordinal) in the capture.
Time elapsed relative to the first packet captured..
Source and destination IP addresses of the packet (or MAC address if lower layer traffic).
Protocol (TCP, UDP, ICMP, DNS…).
IP or Ethernet datagram size.
Source and destination ports (only in the case of TCP and UDP).
Short description of the packet.
Saving a capture in a file#
When we are making a live capture, it might not be possible to inspect
the packets in detail, if there is a too much traffic. If you need this, it
is highly recommended that tshark saves the traffic capture in a file on disk:
tshark -i 1 -w /home/alumno/capture1.pcapng
In this way, the program will not show any information in the output, but it
will save all the capture in the path that you have passed as argument. This
allows us to inspect the traffic capture as many times as we need, open it with
other programs, such as the aforementioned wireshark and even “inject” the
capture again, simulating a traffic already passed.
To show the content of the saved file with tshark, use the following option:
tshark -r /home/alumno/capture1.pcapng
Filtering tshark captures#
tshark allows you to define 2 types of filters:
Capture filter: only the packets that meet the defined filter will be shown and/or saved in the capture.
Display filter: only shows the packets that meet the condition defined by the filter, but the rest will still be saved in the capture.
Capture filters#
This type of filters allows us to lighten the size of the resulting capture. It is suitable when we have a precise idea of which packets we want to be able to analyse in the capture.
To make a capture filtering we must use the following option:
tshark -f <capture filter>
The syntax of the capture filters is the so-called BPF. Allowing us to make filters such as the following:
Filter |
Obtained Result |
|---|---|
icmp |
ICMP traffic |
host 192.168.1.1 |
Traffic to or from the IP 192.168.1.1 |
tcp portrange 1-1024 |
TCP packets received or sent at any port in range 1 to 1024 |
tcp and not http |
TCP packets, but do not contain HTTP traffic |
Although capture filters are very useful, especially for lightening the size of the captures, they are actually less versatile than the display filters as we will see in the next section.
Exercise: filter the packet capture#
In a terminal, start a traffic capture that only captures ICMP packets. Save the capture in a file named
icmp_cap_filter.pcapng.Open a second terminal and make a
pingwith 10 requests to8.8.8.8. Use the-c 10option to stop thepingcommand after sending the 10 requests.When
pinghas finished, stop the capture with Ctrl c.
Display filters#
The display filters allow tshark to capture all traffic (or all traffic
defined in the capture filters) and display only those
packets that we want. This is much more flexible, since with the same capture
we can easily inspect different types of traffic using different display
filters.
Furthermore, unlike capture filters that can only be based on the actual fields
in the packets, display filters can take into account context information that
tshark can extract from the analysis of the complete trace.
For example, with either of the 2 types of filter we could find ICMP packets, but with the display type, we could request to see only ICMP packets that have not received a response.
Although the syntax of the display filters is very similar to that of capture filters, viewed above, they do not follow exactly the same rules.
To define a display filter:
tshark -Y <display filter>
For example, to only view the ICMP packets sent from the IP 192.168.1.11, use
the following filter:
tshark -Y 'ip.src == 192.168.1.11 and icmp'
Note
It is recommended to use single quotes to delimit the filter using terminal commands to prevent the shell from splitting the filter or expanding variables or terminal wildcards.
For layer 2 to 4 protocols, tshark allows filtering by sending, receiving or
either direction:
Protocol |
Source |
Destination |
Anyone |
|---|---|---|---|
Ethernet |
eth.src |
eth.dst |
eth.addr |
IP |
ip.src |
ip.dst |
ip.addr |
TCP |
tcp.srcport |
tcp.dstport |
tcp.port |
UDP |
udp.srcport |
udp.dstport |
udp.port |
Any of these fields can be matched with the equality or inequality operators o
(== o !=).
Exercise: display filters#
In a new terminal, prepare ready to execute the command to download the file phone_new.gif, using for example
wgetbut without running the command for now.wget http://www.esi.uclm.es/www/isanchez/phone_new.gifStart a capture of all traffic with
tsharkwithout using any capture filter. Save this capture in a file namedhttp_get_gif.pcapng.Run the command you prepare in step 1.
Stop
tsharkto end the capture with Ctrl c.Load the capture back into
tsharkand apply a display filter to show only DNS protocol packets.tshark -r /home/alumno/http_get_gif.pcapng -Y 'dns'What IP (DNS server) did your machine connect to in order to make the DNS request for the domain
www.esi.uclm.es?Load the capture back into
tsharkand apply a display filter to show only HTTP protocol packets.tshark -r /home/alumno/http_get_gif.pcapng -Y 'http'What is the IP of the server hosting the image?
Note
In the display filters, protocols must be written in lowercase letters.
Modifiying tshark output#
Sometimes the output provided by the tshark command does not include a field
that may be relevant to us. Of course, the command allows us to modify its
output to show the relevant data we need.
To modify the fields shown by default, we will have to activate the -T option,
indicating in which format we want to show the output (for now use fields),
and with -e we will indicate the columns we want to show. We can use -e
as many times as we need:
tshark -r cap1.pcapng -T fields -e ip.addr -e tcp -e udp -e _ws.col.Info
The above command would show us the source and destination IP addresses, relevant information about TCP or UDP, depending on the transport protocol used by each packet, and finally a special column containing the brief summary of the packet payload.
Note
To see a complete list of all fields that tshark allows us to use with -e,
you can list them with tshark -G fields. The list is quite large, so use the
commands you learned in the first practices to filter or paginate the output.
Exercise:#
Use the capture made in the previous block of exercises named
http_get_gif.pcapng.Load the capture with
tsharkand, filtering only DNS packets, modify the output to show the information related to the transport protocol.tshark -r /home/alumno/http_get_gif.pcapng -Y 'dns' -T fields -e udpWhat were the source and destination ports of the DNS requests?
Reloads the previous capture, but this time filters only HTTP packets. Modify the output to show information related to the transport protocol.
tshark -r /home/alumno/http_get_gif.pcapng -Y 'http' -T fields -e tcpWhich TCP ports did the HTTP request use?
Run the following commands. Say what you observe, what do you think it is due to?
tshark -r /home/alumno/http_get_gif.pcapng -Y 'dns' -T fields -e tcp
tshark -r /home/alumno/http_get_gif.pcapng -Y 'http' -T fields -e udp
Find out the response code of the HTTP request that downloaded the gif file in the example:
tshark -r /home/alumno/http_get_gif.pcapng -Y 'http' -T fields -e _ws.col.Info
Using wireshark#
So far we have seen the use of tshark, which is a command line tool. Its use
is recommended for captures with simple filters or to analyse packets at very
basic levels, such as physical addresses, network addresses or ports, as well as
to filter by protocols quickly.
Its main advantage is that it allows us to redirect the output, using pipelines to other commands to filter information, colour it, or save it in a readable format without having to learn other tools.
However, for deeper analysis, tshark may be too complex, so for those
situations it is fine to use wireshark instead.
Starting wireshark#
Like tshark, its graphical version also allows us to make captures and
visualise them: we can open pcapng files generated with tshark without any
problem and also generate files to be able to analyse them with tshark or
wireshark later.
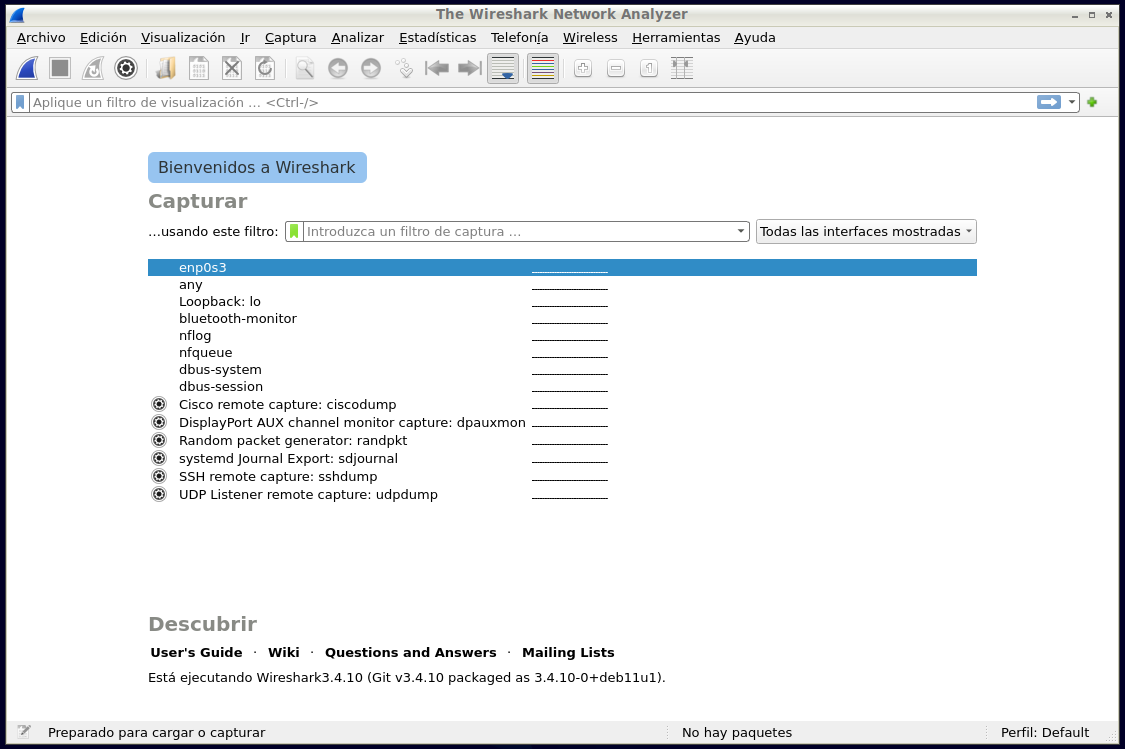
Fig. 4 Screenshot of Wireshark startup window.#
From the initial screen we can select either to start a capture, defining a
capture filter using the same syntax as above, or to open a previously saved
capture file from the File menu.
By clicking on the blue button we can start capturing traffic, and in the text
input box under Capture we can define a capture filter.
Analysis display#
While wireshark is performing a capture or we have loaded one from a file,
you will see a window like the following:
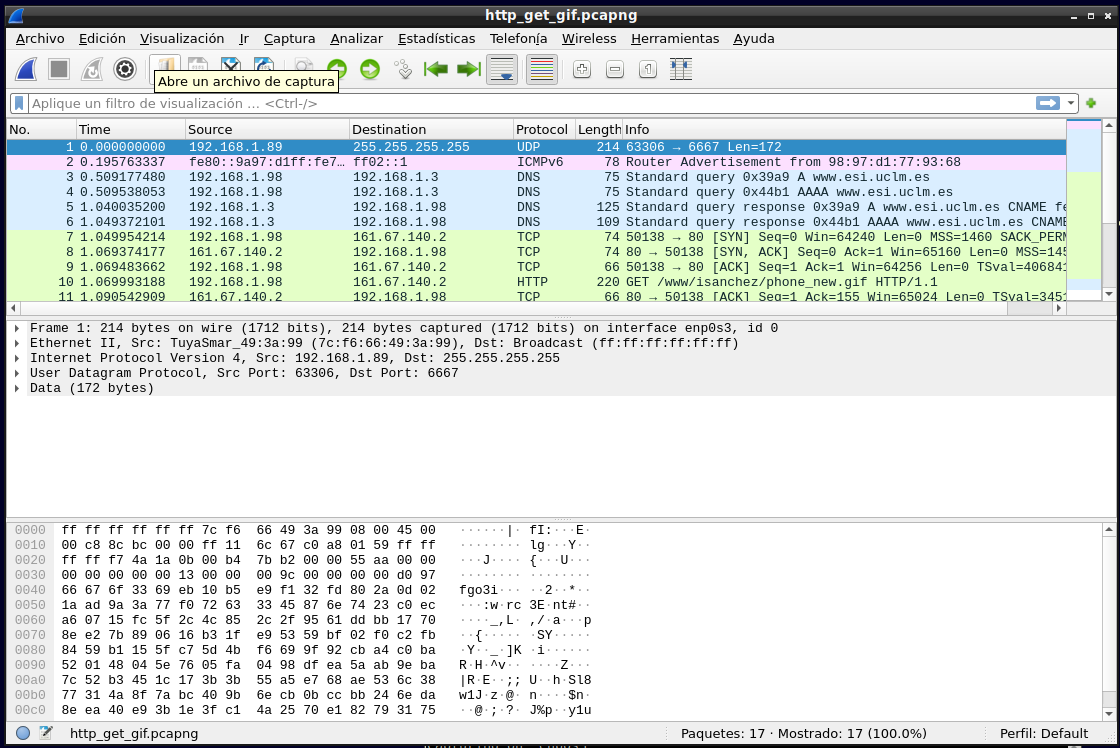
Fig. 5 Screenshot of the analysis display of packets in Wireshark#
This window is divided into 4 important parts, from top to bottom:
Display filter input: allows us to define a display filter, in the same way as with
tshark -Y.List of packets: the packets of the capture and a series of basic information about them are displayed, once the defined filter, if any, has been applied.
Breakdown of selected packet: when we have a packet selected, here we will be able to view internal information of the protocol of each layer.
Hexadecimal and ASCII content of the packets: it shows the information at the lowest possible level, being able to see at all times the correspondence between the hexadecimal value of each byte of the packet and its ASCII representation, if any.
Exercise: analysing a capture with wireshark#
As in the previous exercise, open the
http_get_gif.pcapngcapture, but this time withwireshark.Find the same values as requested in the previous exercise.
Find in the capture the HTTP request corresponding to the download of the GI file from the server and identify the HTTP headers that have been used such as the
User Agent.Repeat the same, but with the HTTP response.