Lab 2 - Command Line II#
We continue with the work we have done in lab 1, deepening a little more in the handling of the command line. This time we will see how to group commands to create scripts and then, to automate tasks. Also how to use some very powerful techniques to optimize functionality between commands such as redirections and pipes. Finally, we will see how to install new programs using the Debian package manager.
Scripts#
One of the most important features of the command line is that everything you do on it can be stored in a file and executed as many times as you want. The command line itself accepts as input an entire programming language (with if statements, for loops, etc.), which makes task automation possible at all levels. These programs that contain a set of commands to be executed at once are known as scripts.
Let’s see how to create very simple scripts from the terminal.
Editing files with nano#
To create a new file, just pass the path in you want to store it. For example:
nano my-file.txt
You can type some text and, when you want, save it to disk usingCtrl o. It will ask for confirmation of the file name, which will be the same as the one you have given, and you accept with Enter. The file will then be saved.
To exit the editor, just use Ctrl x. If you did not save, it will ask you if you want to exit without saving or to save the current changes.
Note
With Ctrl g you can see all the keyboard shortcuts that nano allows. In
particular there are interesting Ctrl k and Ctrl u, which allow
you to cut and paste a line, respectively.
Editing File with gedit#
There are also graphical plain text editors such as gedit. You can launch it
from the terminal by simply using the command gedit.
Warning
Although graphical editors are easier to use, we recommend that you get used to
work with editors such as nano, because these editors are present in many
network hardware such as routers, from where you will not have a graphical
interface. In addition, it is usually much faster to edit small changes with
such tools than with the graphical alternatives.
Exercise: creating a script#
Now that you know how to create a text file, you can create scripts and run
them. For example, create the file /home/alumno/my-script.sh with the
following content:
#!/bin/bash

echo "-- Deployer v1.0 --"

# First, create all directories
mkdir dir1 dir2 dir3

# Then, copy myself into these directories
cp /home/alumno/my-script.sh dir1
cp /home/alumno/my-script.sh dir2
cp /home/alumno/my-script.sh dir3

echo "-- All done! --"
The script is quite simple to understand. There is some new stuff:
The
#!/bin/bashline that is always put at the beginning is known as shebang. That first line needs to start with#!followed by the interpreter you want to use. In this example, we use Bash.The command
echois used to print strings via the standard output.Lines beginning with
#are considered comments, so the interpreter ignores them.
To execute the new script you can do:
bash /home/alumno/my-script.sh
Also is very common to give it execution permissions:
chmod +x /home/alumno/my-script.sh
And, afterwards, you can only launch it by giving the path to the script:
/home/alumno/my-script.sh
Or if you are in /home/alumno:
./my-script.sh
Note
As an exercise, create a script that removes everything the previous script generates.
Searching with grep and find#
One of the most recurrent tasks is to search within files and directories.
grep is a very powerful command to look for patterns in file contents. On the
othe hand, find is a command to look for files and directories whose name
satisfies a given pattern.
The main structure of grep is:
grep [OPTIONS] PATTERN [FILE FILE ...]
The PATTERN argument is the string you want to look for. This string can
simply be a word or even a regular expression, which allows us to define
generic patterns. Let’s see some simple examples:
grep auto /etc/network/interfaces
grep -i AuTo /etc/network/interfaces
grep -i AuTo --color /etc/network/interfaces
grep -i AuTo --color -H /etc/network/interfaces
grep -i AuTo --color -RH /etc/network
In turn, the main structure of find is:
find [STARTING-POINT] [OPTIONS]
Where STARTING-POINT is the path from where it starts searching for files. In
OPTIONS you have all kinds of filters, so you can refine your search (by name,
by size, by type, etc.). Here have some examples:
find
find /usr/bin
find /usr/bin -type f
find /usr/bin -type f -perm 755
find /usr/bin -type f -perm 755 -size +100k
find /usr/bin -type f -perm 755 -size +100k -mtime +100
Redirections#
As we have said, commands are programs. And programs, when run, create execution processes. In a GNU/Linux system, a process has 3 points through which it can communicate with the outside. By default, every process has assigned these file descriptors:
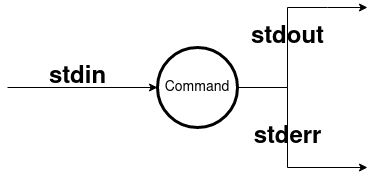
Fig. 2 Default file descriptors of a command.#
stdinor standard input, through which the command can receive information. By default, the standard input is the keyboard.stdoutor standard output, where the command produces its output. By default, the standard output is the command line itself.stderror standard error output, whereby the command can issue error or debugging messages. By default, it is also the command line itself.
Note
Standard output and standard error are separated, primarily to distinguish which parts should be taken as purely command output from error messages. This is very important when using redirection or pipes.
In GNU/Linux, it is possible to change the locations pointed by these file descriptors of the commands. To do this, the following operators are used:
cmd > file.txt: redirects thecmdcommand output in the filefile.txt.If the file does not exist, it is cretated
If the file exists, it is completeley rewritten.
cat /etc/fstab > my-fstab.txt
echo "Hello!" > greetings
echo "World!" > greetings
Note
There is a special file where everything that you do not want to store goes:
/dev/null. It is very common to redirect command output to this file to discard it.cmd >> file.txt: redirects thecmdcommand output in the filefile.txt.If the file does not exist, it is cretated
If the file exists, the output is appended to the end of the file.
cat /etc/fstab > my-fstab.txt
echo "# this goes at the end!" >> my-fstab.txt
cmd < file.txt: redirects thecmdcommand standard input so thatfile.txtis the input and not the keyboard.cat < /etc/fstab
Exercises#
Stores in the
libs.txtfile the files (recursively) ending with.sofrom the/usr/libdirectory.Solution
find /usr/lib -type f -name *.so > libs.txt
cat libs.txt
Add to the end of the same file those ending in
.a.Solution
find /usr/lib -type f -name *.a >> libs.txt
cat libs.txt
Note
For simplicity, there is no mention of how to manipulate the error output, but it is also possible to redirect it like the other two.
Pipes#
Pipelines are probably the most attractive feature of the command line environment in GNU/Linux. It provides the ability to perform non-trivial tasks in a easy, simple and clear way.
The concept is based on what has been seen in redirections,
where all commands had an input and an output flows that could be manipulated.
The pipe operator (denoted with the vertical bar |) connects the output of one
command to the input of another. In this way, commands that perform different
tasks can be joined together to perform, overall, a more complex task.
Note
The UNIX philosophy is behind the pipes: you provide many programs that do specific things and then compose them together to create advanced functionality.
For example:
find /usr/lib -name *.so -type f | less
cat /etc/passwd | grep 100 --color
grep -Hiw network /usr/share/common-licenses/* | cut -f 1 -d ":" | sort -u
Exercises#
Download the file Don Quixote in plain text and count its number of words. You can use the
wccommand for it.¿Would you know how to do the whole proceses, including downloadking the file, with several chained commands?
Solution
$ wget -q https://uclm-esi.github.io/redes1-lab/assets/quijote.txt -O - | wc -w
Root Permissions#
As you may have noticed, there are many items in the file system that you cannot access due to lack of permissions. For example:
$ cat /var/log/messages
cat: /var/log/messages: Permission denied
As we saw in the permissions section, you need to have the appropriate permissions to access a file in order to perform the write, read or execute operation. However, there are also other types of actions that, for security reasons, are reserved for users with management permissions. Some of these operations are:
Add users or groups.
Change passwords from other users.
Install new programas on the system.
Low-level access to network interfaces.
In our virtual machine, the alumno user is configured so that it can execute
commands as a root user when needed. To do this, use the sudo command follow by
the command you want to execute. For example:
sudo cat /var/log/messages
Packages Systems#
If there is one aspect that characterizes a GNU/Linux distribution is the package system it uses. A distribution is based on collecting software that is available as free or open source code, grouping it together and configuring it so that users can access it quickly and easily. The package system is the component with which users can manage the programs they install.
In Debian, the different package systems are based on a very specific format:
the Debian packages. These packages, packaged in .deb files, usually contain
software already compiled and ready to use, plus extra information such as
dependencies on other programs, program author, etc.
dpkg#
Debian packages can be installed directly with the dpkg command. However, you
cannot install packages directly as a normal user, you must have root
permissions:
sudo dpkg -i <path/to/file.deb>
Warning
If the package has dependencies dpkg no will resolve them and will not try
to install them. To do that, you must use apt as we will see later.
You can also remove a package such as:
sudo dpkg -r <package-name>
Note
The package name is different from the .deb file name. For example: the
package myapp-1.0.deb will most likely have the package name as myapp.
And some interesting options to list the system packages and the files contained in a package are:
dpkg -l
dpkg -L <package-name>
apt#
At a higher level of package management is apt. This tool, which uses dpkg
underneath, provides greater functionality since:
Resolves dependencies between packages, installing whatever is necessary.
Access to remote repositories.
aptcan connect to an application store to download and install them automatically.Look for packages based on different criteria (content, description, type, etc.).
The most common ways to use apt are:
sudo apt update
sudo apt search <pattern>
sudo apt show <package-name>
sudo apt install <package-name>
sudo apt remove <package-name>
sudo apt purge <package-name>
sudo apt upgrade
sudo apt full-upgrade
Exercises#
Download the package
redes1and install it usingdpkg. What files does it have? Can you use any of them? Finally, remove it usingdpkg.Solution
dpkg -L redes1You can run
redes1and get a message.Install the
slandtreepackages usingapt. What do they do according to their description? Uninstall the packages completely.Solution
apt update
apt install tree sl
apt show tree
apt show sl
apt purge tree sl